The Math and Code Behind…
Facial alignment is a prereq…
4 years, 7 months ago
by Sabbir Ahmed

Hey, meet MQTT! The perfect protocol in the realm of IoT. Okay, that’s the best non-tech line I can imagine of. First, we have to understand some basic terms.
The Story in a sentence — We will establish our own basic MQTT broker and connect a client to it.
Grab a cup of coffee and let’s get our labs ready!
MQTT: It’s a communication protocol just like HTTP, TCP/IP, and socket but lighter, specially designed for edge devices (microcontroller especially). MQTT is ideal for M2M (Machine2Machine) communication and IoT (Internet of Things). Oh, I missed- MQTT stands for Message Queue Telemetry Transport or MQ telemetry transport developed by Andy Stanford-Clark (IBM) and Arlen Nipper (Eurotech).
MQTT is made with observer pattern in mind. If you are new to Pub/sub model or MQTT or any other communication protocol, please don’t panic, it’s okay. We will start with the very basics.
MQTT has two parts. One is for the server-side another one is for the client. The server side is called a broker, and the clients are always clients. No more jargon lets dive into system configuration.
We will configure MQTT for Debian based distros like Ubuntu, Linux Mint, etc. For simplicity let’s choose Mosquitto MQTT broker. It is opensource and maintained by Eclipse and I love it. Now, open up terminal and type-
sudo apt install mosquitto mosquitto-clients
This is the bare minimum we need. Mosquitto is shipped with the bare-minimum server configuration — that we’ll tweak just a little bit later. We have installed the broker but have not initiated any service or daemon. We will start the mosquitto in verbose mode to see how it is handling the communication
mosquitto -v
You should see something like this- (and don’t close the terminal)

Terminal Output
That means your broker is running with a shipped configuration file on port 1883(the default port) and It’s running on your localhost(127.0.0.1).
Now, We have to understand 3 things for starter-
Read these sections carefully, I will give you an analogy from a product of The PayPal Mafia you most probably have used many times — YouTube. Suppose, you have subscribed to a channel called “Tesla” and clicked the bell icon. Afterward, whenever a new video is posted on the Tesla channel you are notified with the video.
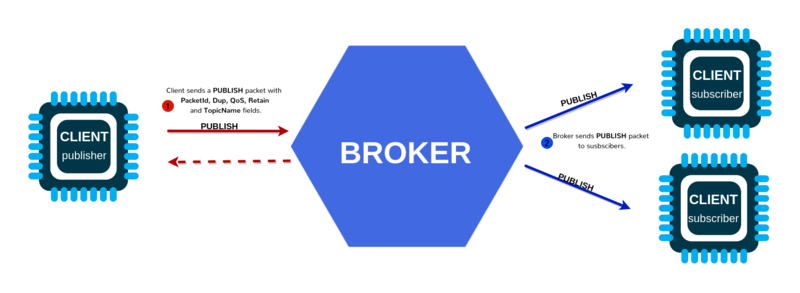
Similarly, In MQTT protocol the channel “Tesla” is a Topic. And the devices are either Publisher or Subscriber. The Publisher sends data to a Topic, the broker checks who else have Subscribed to the specified Topic and send to the Subscribed devices.

MQTT Data Acquisition Model
Let’s dive into a little bit and communicate over the MQTT broker for the first time. To continue, we need to have two terminals open. One will be our subscriber and the other one will be our publisher. Remember installing mosquitto-clients at the very beginning? — This is our client-side tool. It serves two packages,
mosquitto_submosquitto_pubpretty self-explanatory, right? Say, we choose to set up our subscriber client first. Our client will subscribe to a topic named “Tesla”. We need to specify host and port and here’s how to do it.
mosquitto_sub -t Tesla -h 127.0.0.1 -p 1883
Notice the terminal with mosquitto -v has some outputs like

Subscriber Terminal Output
That means a subscriber client has connected to the broker in the topic “Tesla”. Finally, we are ready to publish data, to publish we need an extra parameter called message-
mosquitto_pub -t Tesla -h 127.0.0.1 -p 1883 -m 'Tesla Model X'
If everything goes well, you should see the message in the subscriber client terminal and the terminal with mosquitto -v will show

Publisher Terminal Output
There, we have successfully communicated over MQTT.
It is time we got our hands dirty with some broker configuration. For Mosquitto broker the default configuration can be found in /etc/mosquitto/mosquitto.conf . This is our default configuration file.
You can have a look at all the configuration options at —
Now we will start the broker as a service of Linux. This will allow us to manage the broker easily.
sudo systemctl start mosquitto
If the command above executes without error, this means good news. Now check the status of our broker by-
systemctl status mosquitto

Terminal Output
Notice the 3rd line in the terminal output — active(running) means we are good to go. Now we enable the service at startup.
sudo systemctl enable mosquitto
This will work as a postgres bench or postgres environment. We can start developing hardware and edge devices. For deployment, we need to secure the configuration with TLS and user-password; That’s a story for another day.